Power Wizard Control Panel
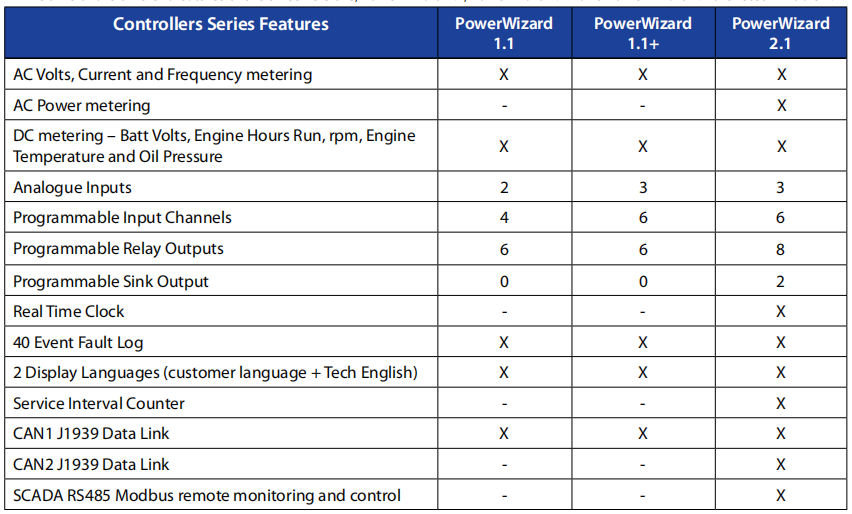
The controller is available in three versions, Power Wizard 1.1, Power Wizard 1.1+ and Power Wizard 2.1.
These are based on different feature sets.This Application and Installation Guide is intended to cover
the Power Wizard Generating set Control and its application in generating set systems.
The Power Wizard product line of generating set controllers is designed for use in a wide range of applications.
They can be used on standby and prime power diesel generating sets including FG Wilson and Olympian brands.
The configurability of the controllers allows them to be used, in some cases, on other applications such as Marine auxiliary generating set, switchgear applications, industrial engines and generating sets as well as gas generating sets.
Power Wizard Variations
Power Wizard Control Module Description
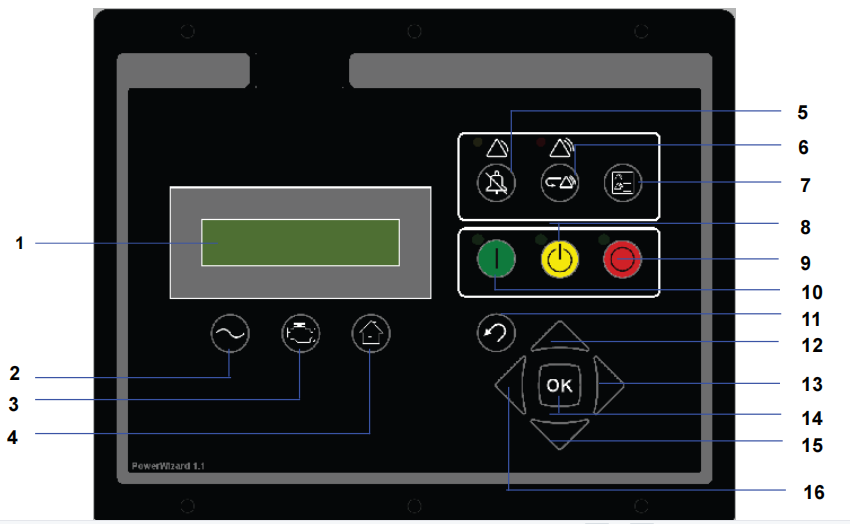
1. Display screen
2. AC overview key ---The AC Overview key will navigate the display to the first screen of AC information.
The AC Overview information contains various AC parameters that summarise the electrical operation of the generating set.
3.Engine overview key---- The Engine Overview key will navigate the display to the first screen of engine information.
The Engine Overview information contains various engine parameters that summarise the operation of the generating set.
4.Main menu or home key--- The Main Menu key will navigate the display to the main menu screen.
Pressing the navigation keys will allow access to menus at all levels.
5. Alarm acknowledge key
6. Event reset key
7. Event log key
8. Auto key---Pressing the Auto key will cause the engine to enter the auto mode.
9. Stop key---Pressing the Stop key will cause the engine to enter stop mode.
10.Run key--Pressing the Run key will cause the engine to enter the run mode.
11. Escape key---The Escape key is used during menu navigation in order to navigate up through the
menu / sub-menu structure. Each key press causes the user to move backwards / upwards through
the navigation menus. The Escape key is also used to exit / cancel out of data entry screens during set point programming.
12. Up key---The Scroll Up key is used to navigate up through the various menus or monitoring screens.
The Scroll Up key is also used during set point entry. During numeric data entry the Scroll Up key is used to increment the digits (0–9).
13. Right key---The Scroll Right key is used during set point adjustment. During numeric data entry,
the Scroll Right key is used to choose which digit is being edited. The Scroll Right key is also used
during certain set point adjustments to select or deselect a check box. If a box has a check mark inside,
pressing the Scroll Right key will cause the check mark to disappear, disabling the function.
14. OK or Enter key---The Enter key is used during menu navigation to select menu items in order to
navigate forward / downward in the menu / sub–menu structure. The Enter key is also used during set
point programming in order to save set point changes. Pressing the Enter key during set point programming
causes set point changes to be saved to memory.
15. Down key---The Scroll Down key is used to navigate down through the various menus or monitoring screens.
The Scroll Down key is also used during set point entry. During numeric data entry the Scroll Down key is used in order to decrement the digits (0–9).
16. Left key---The Scroll Left key is used during set point adjustment. During numeric data entry,
the Scroll Left key is used to choose which digit is being edited. The Scroll Left key is also used
during certain set point adjustments to select or deselect a check box.
Generator Controller ASM168
How to use a generator safely at home?